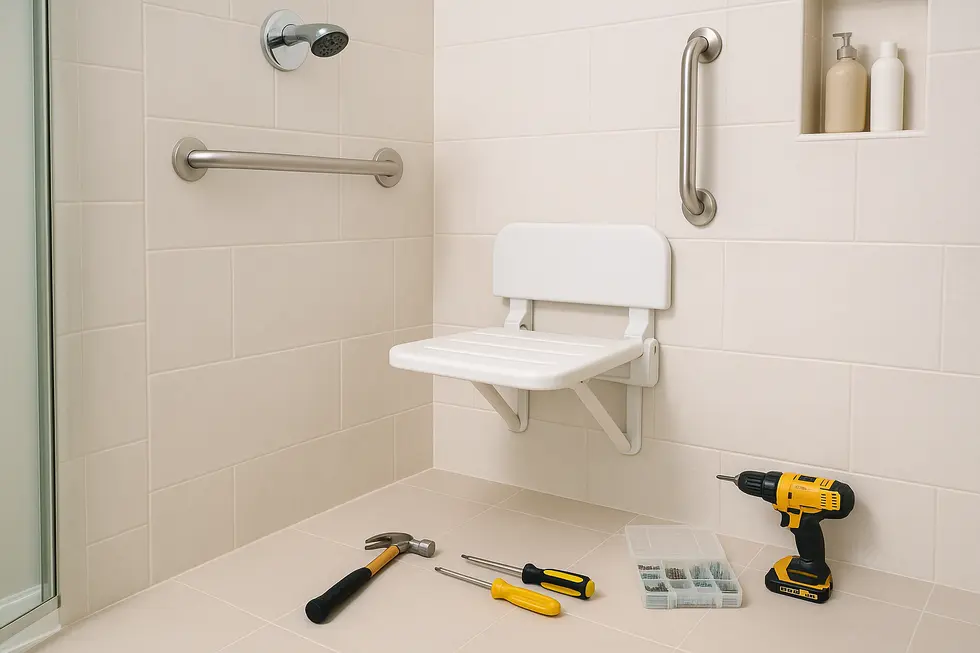
Shower Seat
Installing a Wall-Mounted Shower Seat for Family Safety and Accessibility
Jun
Installing a wall-mounted shower seat is an excellent way to enhance bathroom safety and accessibility for family members, particularly those with mobility issues or the elderly. This comprehensive guide will walk you through the tools and steps necessary for installation, discuss structural safety and support considerations, and cover important accessibility and ADA compliance guidelines. By understanding these aspects, you can ensure a safe, easy-to-use bathroom fixture that benefits everyone in the home.
From Pencil Marks to Final Tighten: A Seamless Guide to Installing Your Wall-Mounted Shower Seat

Selecting the right spot is half the battle. Begin by standing inside the shower and mimicking a seated posture; wherever your hips naturally settle will likely fall within the ADA-friendly 17–19-inch range. With that height in mind, hold the folded seat against the wall and, while a helper steadies it, run a level across the top. A perfectly horizontal pencil line here becomes the backbone for every hole you will drill.
Stud location now dictates structural success. Glide a stud finder across the tile until it beeps twice in succession—mark those centers. If the bracket holes do not coincide with studs, install heavy-duty wall anchors rated well above 250 lb. For masonry or porcelain, switch to a carbide-tipped bit, keeping the drill speed low to avoid glazing the tile surface.
Slip on safety glasses, then create pilot holes just deep enough for the provided screws. A gentle tap of the bit through glazed tile followed by firmer pressure once you reach the backer board prevents cracks. Next, align the mounting bracket with your layout marks and drive the screws home with a steady wrist; overtightening can strip anchors or fracture tile, so stop the moment resistance peaks.
Most contemporary seats click onto their brackets via concealed hinges. Lift the panel, engage the hinge pins, and drop it until you hear a satisfying snap. If your model features stabilizing legs, extend them now and tweak their feet until they kiss the floor without lifting the bracket. Once assembled, press down firmly on both sides of the seat; minimal flex signals a solid install.
Finish by running a finger of silicone around each fastener head to block moisture migration, then wipe stray dust from tile joints. With the bench folded against the wall, the shower regains its spacious feel, yet accessibility is only a flick of the wrist away.
For a photo-rich, step-by-step comparison of anchor types, visit this detailed installation walkthrough. Payless Bath Makeover’s illustrated tutorial offers additional drilling tips that complement the process above.
Building on Strength: Ensuring Rock-Solid Support for a Wall-Mounted Shower Seat

A wall-mounted shower seat is only as dependable as the structure that holds it. Before the drill ever meets tile, confirm that the chosen wall can bear a dynamic load—people rarely sit perfectly still, so plan for at least 500 lb of force. Start by scanning the surface with a stud finder. Timber studs, concrete block, or steel framing with reinforced backing provide the backbone your brackets need; hollow drywall or thin fiberglass panels do not. When the ideal stud spacing does not align with the seat’s pre-drilled holes, resist the temptation to rely on toggle bolts alone. Instead, open the wall and add a horizontal 2 × 10 blocking plate or an exterior-grade plywood sheet between studs, then seal the cavity with moisture-resistant backer board before retiling.
Hardware matters just as much as lumber. Select corrosion-resistant stainless anchors supplied by the manufacturer or their exact equivalent. A bracket secured with three #12 screws driven into solid wood will outperform half a dozen lighter fasteners distributed across weak plaster. Keep the driver speed low and stop when each screw seats flush; overtightening strips threads and invites rust. Once mounted, hinge arms should swing freely but lock firmly. Cycle the mechanism several times, listening for metallic scraping—an early warning of misalignment that could shear pins under load.
Height selection blends comfort with code. Position the seat surface 17–19 inches above the finished floor, a range that promotes safe wheelchair transfers and aligns with grab bars set 33–36 inches high. Use a laser level, not guesswork, when striking your layout lines; even a half-inch tilt funnels water toward one corner and stresses hinges unevenly. After tightening the last screw, simulate real-world forces: press down on each edge, wiggle side-to-side, and then sit steadily for a full minute. No creaks, no movement—only then is the seat ready. For additional pointers on long-term maintenance and inspection intervals, see this guide to safety considerations for wall-mounted shower seats. Comprehensive visuals of reinforcement techniques are available here: https://paylessbathmakeover.com/how-to-install-shower-seat/.
Building Confidence: Meeting ADA Standards When Installing a Wall-Mounted Shower Seat

A wall-mounted shower seat only delivers true peace of mind when it satisfies the Americans with Disabilities Act (ADA). Compliance is less about ticking boxes and more about guaranteeing that every user—whether recovering from surgery, managing chronic pain, or simply aging in place—can bathe independently and safely.
Begin with height. ADA best practice places the seat between 17 and 19 inches above the finished floor, mirroring most wheelchair and toilet heights to simplify lateral transfers. Measure twice before drilling, because even a one-inch deviation can force a user to lift or drop their body weight—an unnecessary strain.
Next, confirm the load capacity. Regulations call for support of at least 250 lb, yet contemporary designs often reach 500 lb. The figure on the box only matters if the wall matches it; therefore, anchor brackets directly into solid studs or masonry backing. When studs do not align with factory mounting holes, install an intermediate plywood ledger spanning multiple studs so every fastener bites into lumber, not tile adhesive.
Material selection also influences longevity and hygiene. Water-resistant phenolic or sealed teak resists mold and is smooth against skin. Choose hinges with corrosion-resistant stainless hardware and a folding mechanism that requires minimal force—vital for users with limited grip strength. A spring-assisted hinge, as described in this concise folding wall-mounted shower seat guide, illustrates how effortless operation can be.
ADA compliance extends beyond the seat itself. Install horizontal grab bars 33–36 inches above the floor on the back and control side walls, ensuring fasteners do not clash with seat hardware. Maintain at least 30 inches of clear floor space in front of the seat for wheelchair pivoting, and keep handheld shower controls within easy reach while seated.
Finally, test the installation. Apply 250 lb of downward force for a full minute and watch for flexing. Tighten any loosened screws, seal penetrations with silicone, and document the measurements for future inspections.
For a deeper dive into precise grab-bar dimensions and mounting techniques, consult the comprehensive external resource on ADA grab-bar placement: https://www.bhsfactory.com/blogs/the-complete-guide-to-ada-grab-bars-height-placement-dimensions-compliance-requirements
Final thoughts
Installing a wall-mounted shower seat can significantly improve the safety and accessibility of your bathroom for every family member. By following detailed installation steps, ensuring structural integrity, and adhering to ADA guidelines, you create a practical and secure bathroom solution. This guide ensures that you can confidently approach the installation process with a focus on safety and compliance, ultimately benefiting your household’s comfort and independence.
Experience a new standard of clean with PEGABidet—designed for comfort, safety, and independence. Join thousands who trust us to make personal care simple and dignified. Contact us at contact@pegabidet.com
About us
PEGABidet is a brand owned by L.A NEXTGEN LLC, based in California. We design intuitive, hygienic, and accessible bathroom solutions that prioritize safety, dignity, and independence. Our mission is to make personal care effortless and empowering for people at every stage of life.